Developer Guide
![]()
Coydir
The Ultimate Company Directory
Coydir /(‘kohy-də)/
Financial Resources may be the lifeblood of a company, but human resources are the brains. - Rob Silzer
Revolutionize your company and become an Industry Leader today with Coydir!
Table of Contents
- Acknowledgements
- Setting up, getting started
- Design
- Implementation
- Documentation, logging, testing, configuration, dev-ops
- Appendix: Requirements
- Appendix: Instructions for manual testing
Acknowledgements
This project is based on the AddressBook-Level3 project created by the SE-EDU initiative.
Setting up, getting started
Refer to the guide Setting up and getting started.
Design
.puml files used to create diagrams in this document can be found in the diagrams folder. Refer to the PlantUML Tutorial at se-edu/guides to learn how to create and edit diagrams.
Architecture
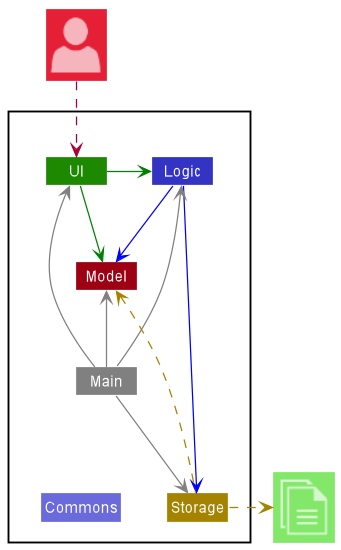
The Architecture Diagram given above explains the high-level design of the App.
Given below is a quick overview of main components and how they interact with each other.
Main components of the architecture
Main has two classes called Main and MainApp. It is responsible for,
- At app launch: Initializes the components in the correct sequence, and connects them up with each other.
- At shut down: Shuts down the components and invokes cleanup methods where necessary.
Commons represents a collection of classes used by multiple other components.
The rest of the App consists of four components.
-
UI: The UI of the App. -
Logic: The command executor. -
Model: Holds the data of the App in memory. -
Storage: Reads data from, and writes data to, the hard disk.
How the architecture components interact with each other
The Sequence Diagram below shows how the components interact with each other for the scenario where the user issues the command delete 1.

Each of the four main components (also shown in the diagram above),
- defines its API in an
interfacewith the same name as the Component. - implements its functionality using a concrete
{Component Name}Managerclass (which follows the corresponding APIinterfacementioned in the previous point.
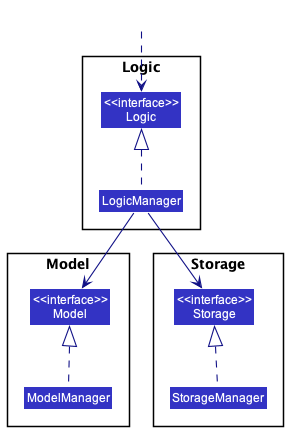
For example, the Logic component defines its API in the Logic.java interface and implements its functionality using the LogicManager.java class which follows the Logic interface. Other components interact with a given component through its interface rather than the concrete class (reason: to prevent outside component’s being coupled to the implementation of a component), as illustrated in the (partial) class diagram below.
The sections below give more details of each component.
UI component
The API of this component is specified in Ui.java
The UI consists of a MainWindow that is made up of parts e.g.CommandBox, ResultDisplay, PersonListPanel, StatusBarFooter etc. All these, including the MainWindow, inherit from the abstract UiPart class which captures the commonalities between classes that represent parts of the visible GUI.
The UI component uses the JavaFx UI framework. The layout of these UI parts are defined in matching .fxml files that are in the src/main/resources/view folder. For example, the layout of the MainWindow is specified in MainWindow.fxml
The UI component,
- executes user commands using the
Logiccomponent. - listens for changes to
Modeldata so that the UI can be updated with the modified data. - keeps a reference to the
Logiccomponent, because theUIrelies on theLogicto execute commands. - depends on some classes in the
Modelcomponent, as it displaysPersonobject residing in theModel.
Logic component
API : Logic.java
Here’s a (partial) class diagram of the Logic component:
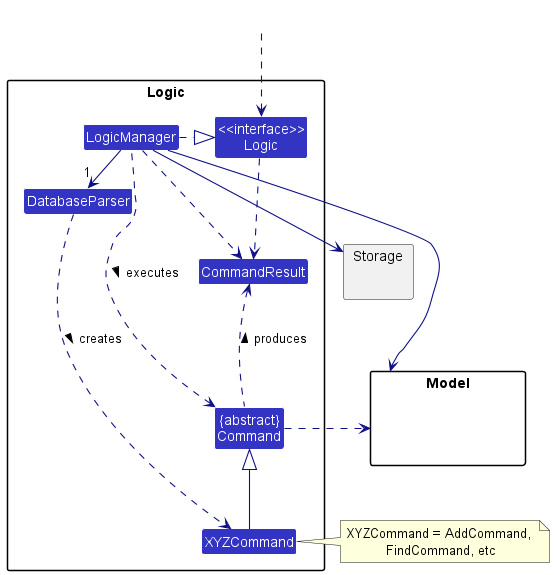
How the Logic component works:
- When
Logicis called upon to execute a command, it uses theDatabaseParserclass to parse the user command. - This results in a
Commandobject (more precisely, an object of one of its subclasses e.g.,AddCommand) which is executed by theLogicManager. - The command can communicate with the
Modelwhen it is executed (e.g. to add a person). - The result of the command execution is encapsulated as a
CommandResultobject which is returned back fromLogic.
The Sequence Diagram below illustrates the interactions within the Logic component for the execute("delete 1") API call.
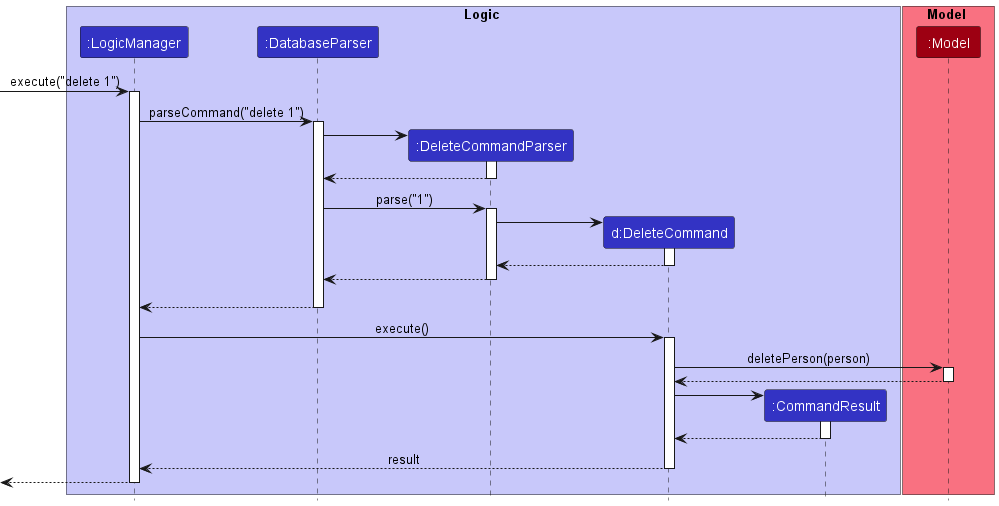
DeleteCommandParser should end at the destroy marker (X) but due to a limitation of PlantUML, the lifeline reaches the end of diagram.
Here are the other classes in Logic (omitted from the class diagram above) that are used for parsing a user command:
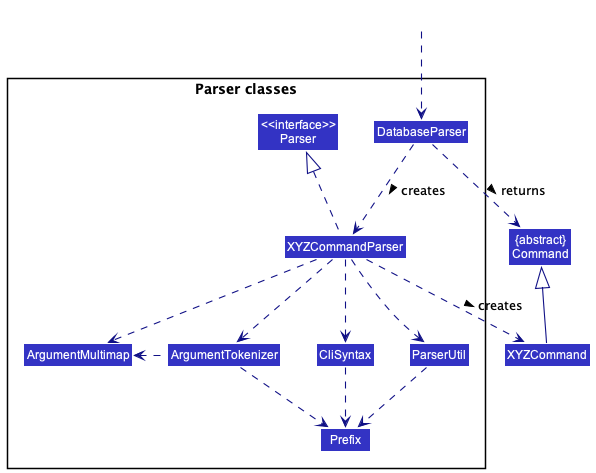
How the parsing works:
- When called upon to parse a user command, the
DatabaseParserclass creates anXYZCommandParser(XYZis a placeholder for the specific command name e.g.,AddCommandParser) which uses the other classes shown above to parse the user command and create aXYZCommandobject (e.g.,AddCommand) which theDatabaseParserreturns back as aCommandobject. - All
XYZCommandParserclasses (e.g.,AddCommandParser,DeleteCommandParser, …) inherit from theParserinterface so that they can be treated similarly where possible e.g, during testing.
Model component
API : Model.java
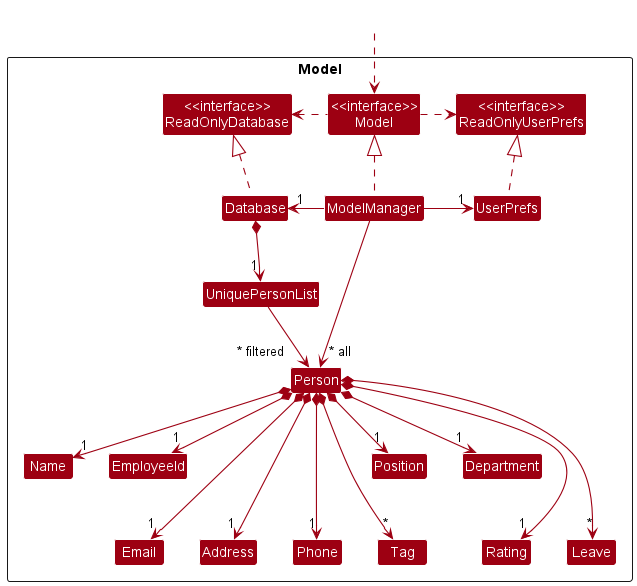
The Model component,
- stores the Coydir data i.e., all
Personobjects (which are contained in aUniquePersonListobject). - stores the currently ‘selected’
Personobjects (e.g., results of a search query) as a separate filtered list which is exposed to outsiders as an unmodifiableObservableList<Person>that can be ‘observed’ e.g. the UI can be bound to this list so that the UI automatically updates when the data in the list change. - stores a
UserPrefobject that represents the user’s preferences. This is exposed to the outside as aReadOnlyUserPrefobjects. - does not depend on any of the other three components (as the
Modelrepresents data entities of the domain, they should make sense on their own without depending on other components)
Storage component
API : Storage.java
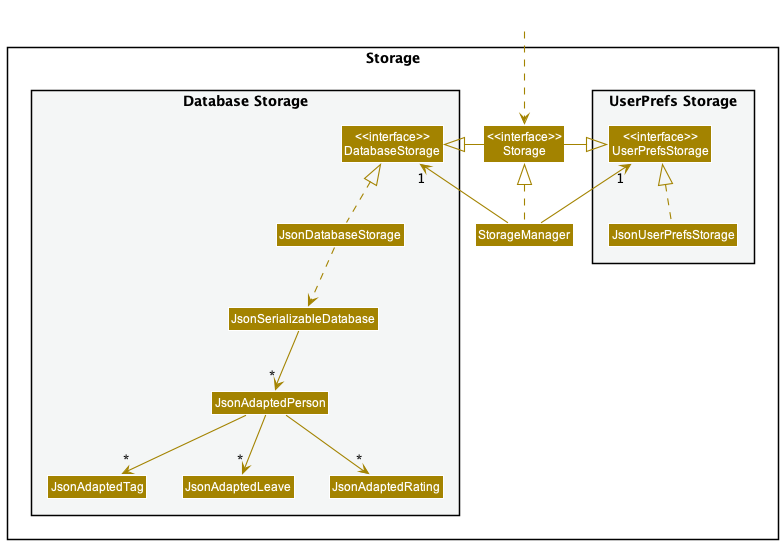
The Storage component,
- can save both Coydir data and user preference data in json format, and read them back into corresponding objects.
- inherits from both
DatabaseStorageandUserPrefStorage, which means it can be treated as either one (if only the functionality of only one is needed). - depends on some classes in the
Modelcomponent (because theStoragecomponent’s job is to save/retrieve objects that belong to theModel)
Common classes
Classes used by multiple components are in the coydirbook.commons package.
Implementation
This section describes some noteworthy details on how certain features are implemented.
Add feature
Implementation
This section explains the implementation of the add feature. The command takes in two compulsory parameters which is the employee name and position, executing the command leads to the addition of an employee person into the records of coydir.
Below is a sequence diagram and explanation of how add is executed.
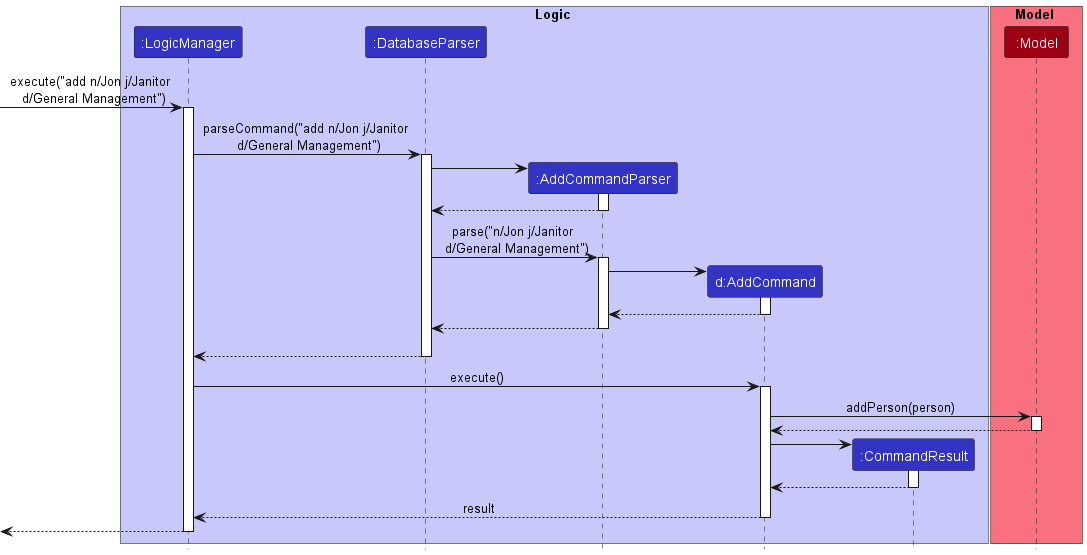
Step 1. The user enters the command add n/Jon j/janitor d/General Management.
Step 2. The method LogicManager#execute is called on the user input, prompting for AddCommandParser to parse the user input and create the AddCommand object.
Step 3. The execute method of AddCommand is then called on the object, which returns a CommandResult object.
Step 4. This adds the person from the list to the model. The employeeID is set and if there already exist a person object with the same field data, a CommandException will be thrown and a message indicating duplicate person will be shown. If the person object does not exist, then using model#addPerson(), the person object is added to the database.
Step 5. storage#saveDatabase is then called on the current database, updates the database to contain the new person.
Delete feature
Implementation
This section explains the implementation of the delete feature. The command takes in one parameter which is the employee ID, executing the command leads to the removal of the employee with that specific employee ID from coydir.
Below is a sequence diagram and explanation of how delete is executed.

Step 1. The user enters the command delete 1.
Step 2. The method LogicManager#execute is called on the user input, prompting for DeleteCommandParser to parse the user input and create the DeleteCommand object.
Step 3. The execute method of DeleteCommand is then called on the object, which returns a CommandResult object.
Step 4. This finds the person from the database by its employee ID which is 1 in this case. If there does not exist a person object with employee ID of 1, a CommandException will be thrown and a message indicating invalid ID given will be shown. If the person object exists, then using model#deletePerson(), the person object is deleted from the database.
Step 5. storage#saveDatabase is then called on the current database, updates the database to not contain the deleted person.
Find feature
This section explains the implementation of the find feature.
The command takes in a number of parameters, which serve as the “filters” for the finding/searching function.
At present, we have implemented finding by name, department, position, and any combination of these three mandatory fields for an employee. Thus it is possible to use these altogether to search for a person with high specificity.
Implementation
The find command updates the model’s filtered persons list based on the search filters.
- On the UI, the side panel will, by default, display the employee profile of the first person in the filtered list.
- If there is none, then it will show the home panel.
Below is a sequence diagram and explanation of how find is executed. In this simple example, we will look at the command find n/Alex.
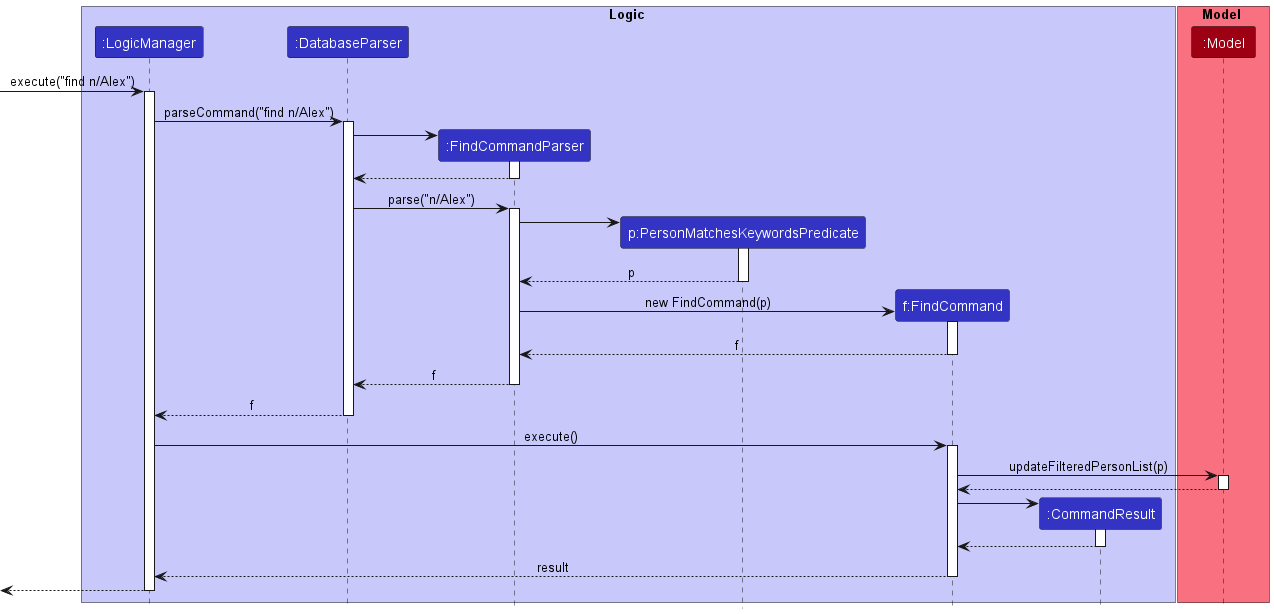
Step 1. The user enters the command find n/Alex.
Step 2. The method LogicManager#execute is called on the user input, prompting for FindCommandParser to parse the user input and create the FindCommand object.
Step 3. The execute method of FindCommand is then called on the object.
Step 4. This then calls the model#updateFilteredPersonList method, which iterates through the list of Person objects returned by the database for the search parameter specified (in this case, name being “Alex”). It then keeps track of any Person objects that matches this specified parameter.
Step 5. This returns a CommandResult object, which is returned to the LogicManager, and eventually, the MainWindow, prompting the MainWindow to call model#getFilteredPersonList and display the first-indexed person, if there is any.
View feature
This section explains the implementation of the view feature. The command takes in one parameter which is the index. Executing the command leads to the more detailed information of the specific employee to be shown on the right panel.
Below is a sequence diagram and explanation of how view is executed.
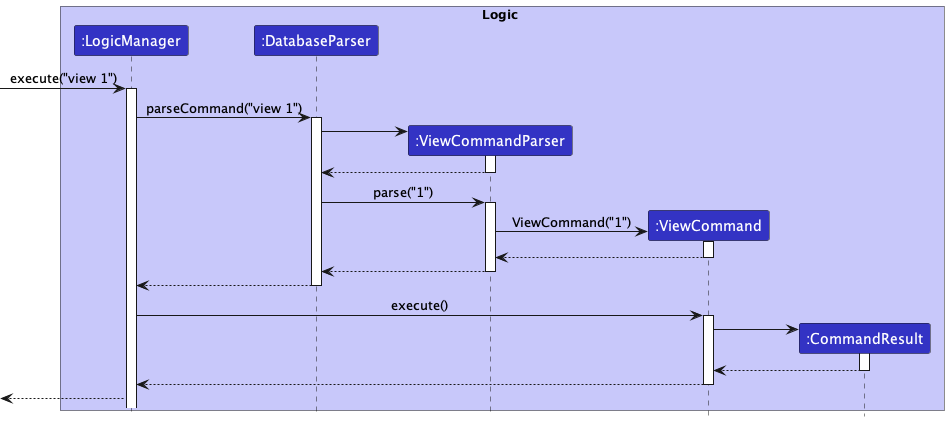
Step 1. The use enters the command view 1.
Step 2. The method LogicManager#execute is called on the user input, prompting for ViewCommandParser to parse the user input and create the ViewCommand object.
Step 3. The execute method of ViewCommand is then called on the object, which returns a CommandResult object.
Step 4. This finds the person from the list from the model#getFilteredPersonList by its index which is 1 in this case. If there does not exist a person object with index 1, a CommandException will be thrown and a message indicating invalid index given will be shown. If the person object exists, then the MainWindow#handleView will be triggered, which results in the panel on the right being updated with the correct person information.
View Department feature
This section explains the implementation of the view-department feature. The command takes in one parameter which is the name of the department. Executing the command leads to the more detailed information of the specified department to be shown on the right panel.
Below is a sequence diagram and explanation of how view-department is executed.
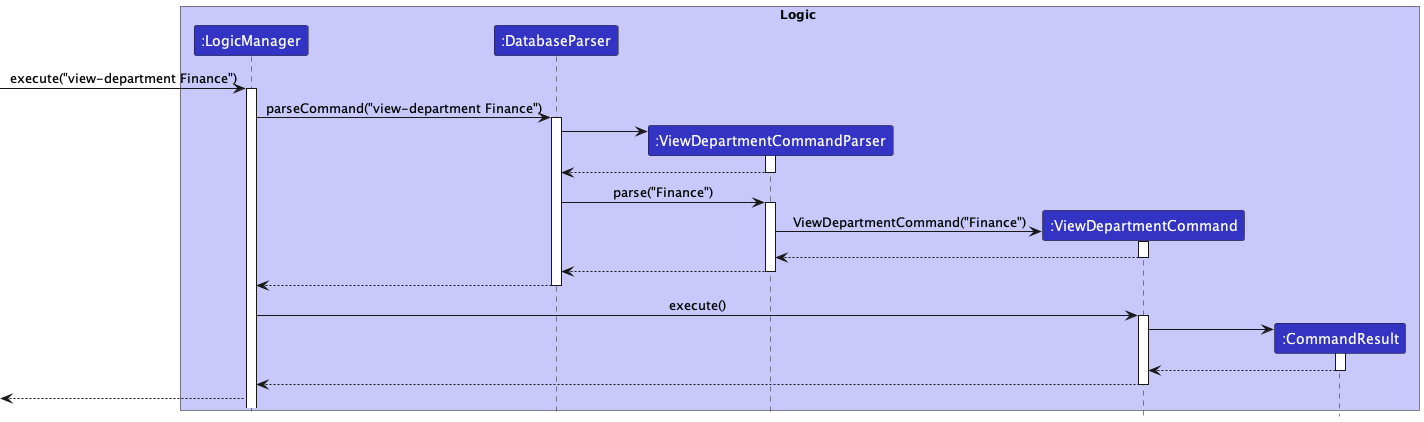
Step 1. The use enters the command view-department Finance.
Step 2. The method LogicManager#execute is called on the user input, prompting for ViewDepartmentCommandParser to parse the user input and create the ViewDepartmentCommand object.
Step 3. The execute method of ViewDepartmentCommand is then called on the object, which returns a CommandResult object.
Step 4. This checks if the department exist using the department#isValidDepartmnet by the department name which is Finance in this case. If there does not exist such department in the standardized list of departments in departments#VALID_DEPARTMENTS, a CommandException will be thrown and a message indicating invalid department will be shown. If the department exists, then the MainWindow#handleViewDepartment will be trigger, which results in the panel on the right being updated with the correct department information.
Rate feature
This section explains the implementation of the rate feature.
The command takes in 2 parameters: employee ID, and rating value.
Implementation
When a valid input is given, the rate command will add the given rating to the employee of the given ID.
- On the UI, a new node with the rating value and timestamp will be added to the
performanceHistorygraph in the employee profile at the side panel. - The “Performance” field will also be updated accordingly, which reflects the latest employee rating value.
Below is a sequence diagram and explanation of how rate is executed. In this example, we will look at the command rate id/1 r/3.
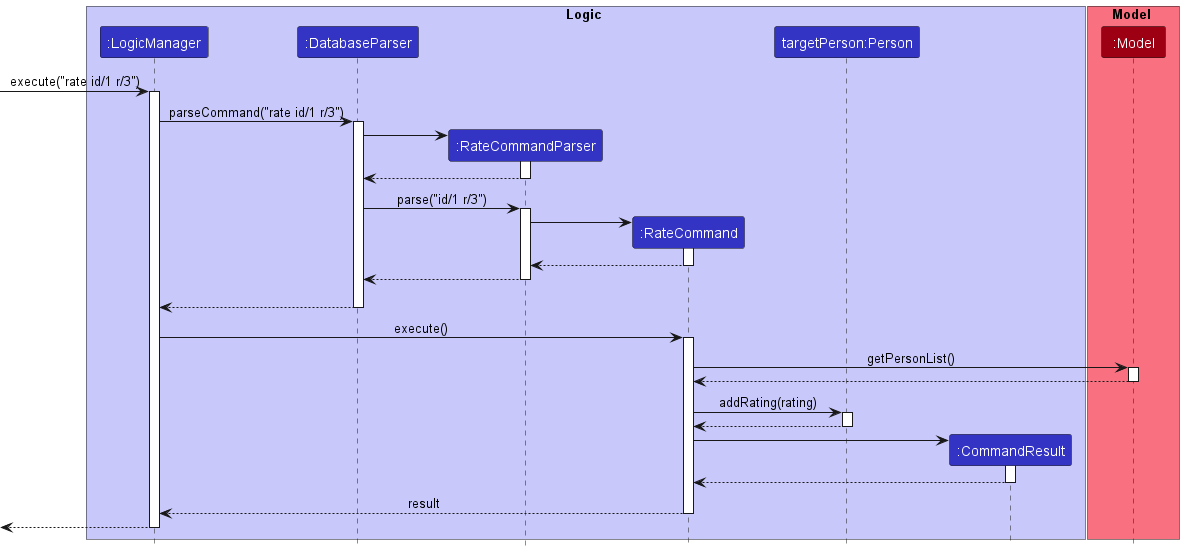
Step 1. The user enters the command “rate id/1 r/3”.
Step 2. The method LogicManager#execute is called on the user input, prompting for RateCommandParser to parse the user input and create the RateCommand object.
Step 3. The execute method of RateCommand is then called on the object.
Step 4. This calls the model#getPersonList method, which returns a list of employees.
Step 5. The target employee is then taken from the list by their employee ID from the input.
Step 6. The Person#addRating method is then called on the employee, and the new Rating is added to the employee.
Step 7. This returns a CommandResult object, which is returned to the LogicManager.
Add leave feature
This section explains the implementation of the add-leave feature.
The command takes in 3 parameters: employee ID, start date of leave, and end date of leave.
Implementation
When a valid input is given, the add-leave command will add the given leave period to the employee of the given ID.
- On the UI, the leave period will be added to the leave table shown in the employee profile at the side panel.
- The “Leaves-Left” field will also be updated accordingly, which is the deduction of the number of days which the new leave spans, from its previous value.
Below is a sequence diagram and explanation of how add-leave is executed. In this example, we will look at the command add-leave id/1 sd/01-01-2022 ed/01-01-2022.

Step 1. The user enters the command “add-leave id/1 sd/01-01-2022 ed/01-01-2022”.
Step 2. The method LogicManager#execute is called on the user input, prompting for AddLeaveCommandParser to parse the user input and create the AddLeaveCommand object.
Step 3. The execute method of AddLeaveCommand is then called on the object.
Step 4. This calls the model#getPersonList method, which returns a list of employees.
Step 5. The target employee is then taken from the list by their employee ID from the input.
Step 6. The Person#addLeave method is then called on the employee, and the new leave period is added to the employee.
Step 7. This returns a CommandResult object, which is returned to the LogicManager.
Delete leave feature
This section explains the implementation of the delete-leave feature.
The command takes in 2 parameters: employee ID, and the one-based index of leave in the leave table of the employee.
Implementation
When a valid input is given, the delete-leave command will delete the given leave period of the employee of the given ID.
- On the UI, the leave period will be removed from the leave table shown in the employee profile at the side panel.
- The “Leaves-Left” field will also be updated accordingly, which is the addition of its previous value and the number of days which the deleted leave spans.
Below is a sequence diagram and explanation of how delete-leave is executed. In this example, we will look at the command delete-leave id/1 i/1.
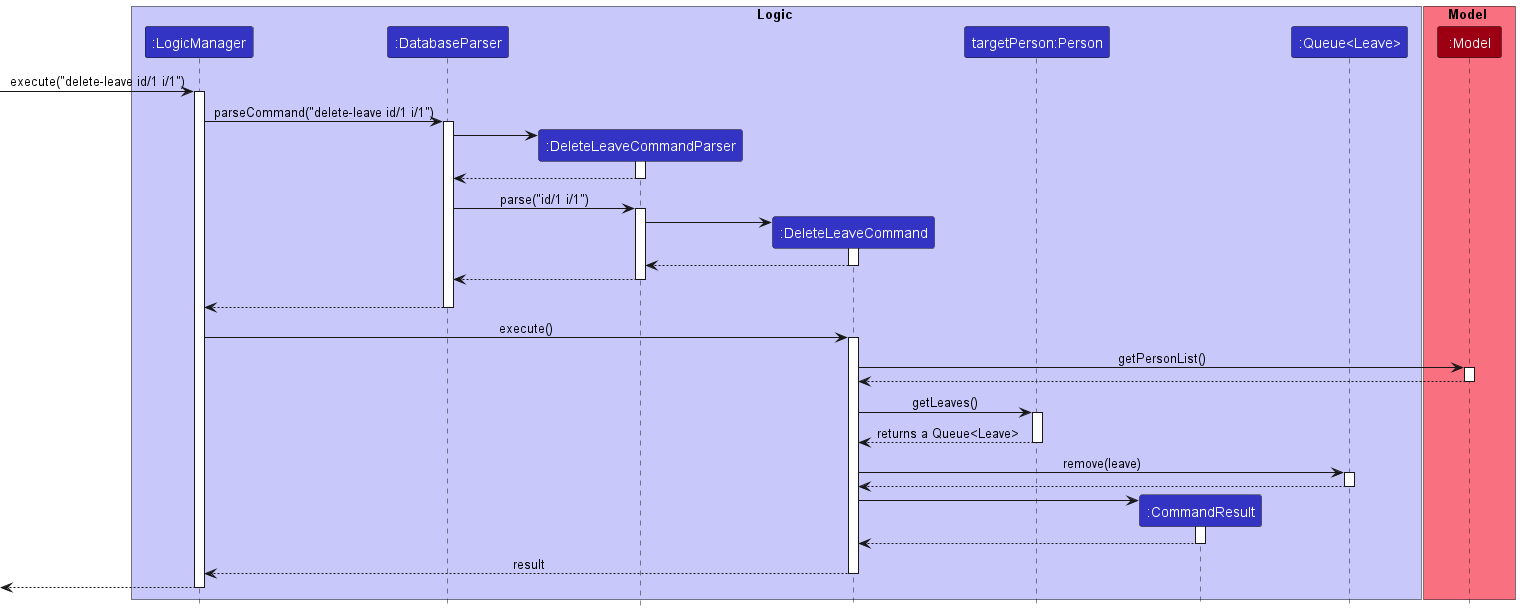
Step 1. The user enters the command “delete-leave id/1 i/1”.
Step 2. The method LogicManager#execute is called on the user input, prompting for DeleteLeaveCommandParser to parse the user input and create the DeleteLeaveCommand object.
Step 3. The execute method of DeleteLeaveCommand is then called on the object.
Step 4. This calls the model#getPersonList method, which returns a list of employees.
Step 5. The target employee is then taken from the list by their employee ID from the input.
Step 6. The leave to be removed is created based of its index in the Queue<Leave> of the employee, then Queue#remove is called with the leave as parameter.
Step 7. This returns a CommandResult object, which is returned to the LogicManager.
Batch-Add feature
This feature is created for users to add multiple entries at once. In the case of this application, there are two main reasons why our User (HR Executive) would use this.
- User is new and needs to import all the current data into the database.
- There is a new recruitment cycle and company has recruited a large number of employees.
Moving on to the implementation, some things to note.
- As of now, our feature only accommodates adding from a CSV file.
- Fields does not allow for commas inside.
These are possible things to work on for future iterations.
Implementation
Pre-requisites: User has a CSV file filled with whatever information they want to batch-add
and has stored it in the /data folder of the repository.
UML Diagram:
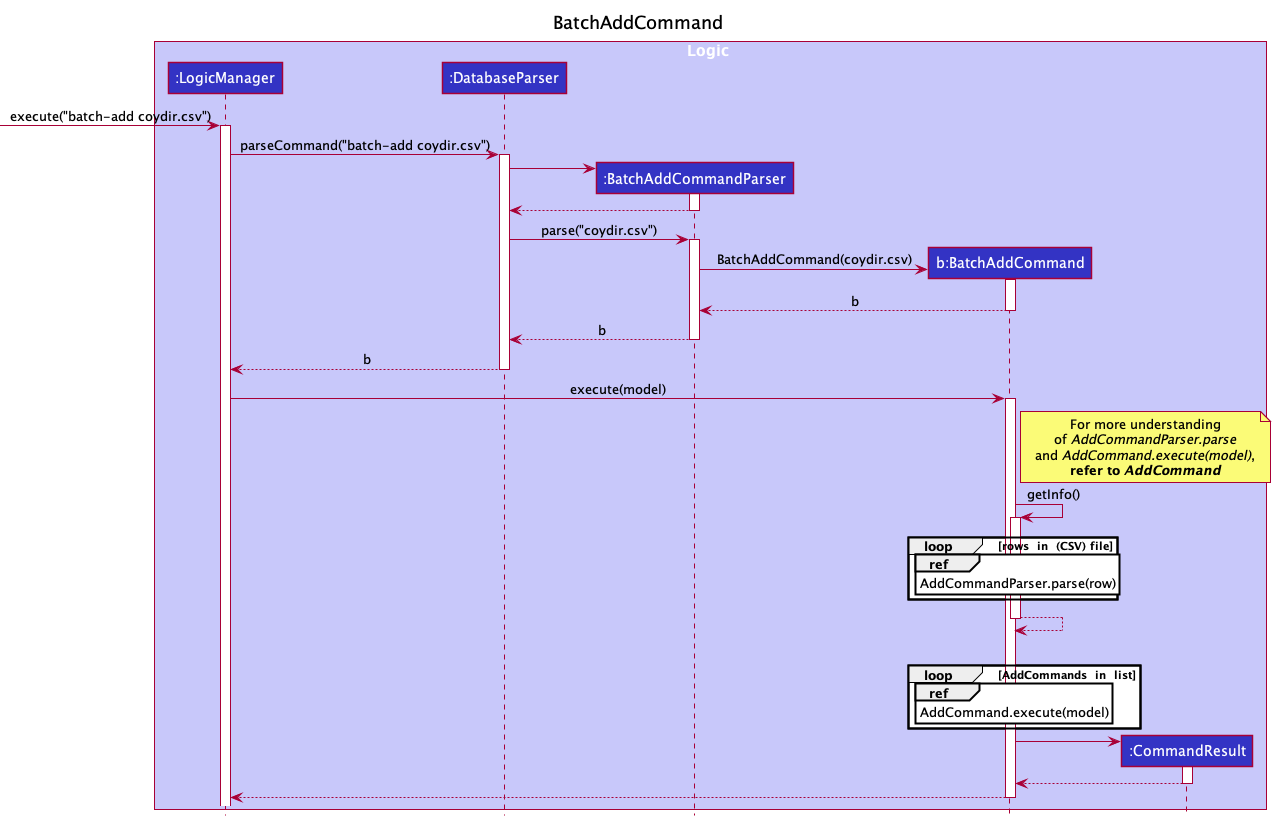
Steps:
Step 1. User launches the application.
Step 2. User executes batch-add filename command. In the LogicManager class, the DatabaseParser method is called.
This will return a new BatchAddCommandParser object and parse function is then called.
A helper function in ParserUtil helps to trim the filename and check if it is valid.
Note: If no argument is provided or file not in CSV format, aParseException will be thrown.
Step 3. The parse function returns a BatchAddCommand which is then executed. In this execute function, the first
step would be to read the information in the CSV file (getInfo function). A BufferedReader object is used to read the CSV file and converts
each row to a string of arguments (following the add command requirements) and creates a new AddCommand. These new AddCommands will be added
into a List<AddCommand>.
Note: If file does not exist in the folder, a FileNotFound exception is thrown too.
Step 4. Once getInfo returns a List<AddCommand>, the list will then be iterated through to execute each AddCommand.
If there is any duplicate Person found, the function call will be aborted and the database will be reverted to its original state.
Step 5. storage#saveDatabase is then called on the current database, updates the database to contain the new persons added.
Design Considerations
Aspect: How Batch-add is run
- Alternative 1 (Current Choice): Make use of the execution of the
AddCommand.- Pros: Makes use of the Error Handling that the
AddCommandhas. - Cons:
BatchAddwill fail if Add fails.
- Pros: Makes use of the Error Handling that the
- Alternative 2: Own implementation of
BatchAddwithout relying onAddCommand.- Pros: If Add Fails, BatchAdd can still work.
- Cons: Implementation Heavy.
Aspect: How Batch-add .csv file is processed
- Alternative 1 (Current Choice): Use the positioning of columns to import data (i.e Have a fixed row position for each command).
- Pros: No need for header rows
- Cons: If the user orders it wrongly, it will not work.
- Alternative 2: Use the Header row to determine the data used.
- Pros: No need to follow a specific ordering.
- Cons: Name of headers need to be the exact name used.
Documentation, logging, testing, configuration, dev-ops
Appendix: Requirements
Product scope
Target user profile:
Our target users would include Human Resources Executives (HRE) and Head of Departments (HOD) who:
- types fast
- are comfortable with using CLI for inputting commands
- require a centralized platform for accessing and updating employees’ data
- is a Top-level management executive in charge of an organization’s employees
Value proposition:
Coydir enables the Company’s HR executive to quickly access the list of all employees, and make necessary updates based on changes in the company’s structure. This grants excellent visualization of the company structure, which will be useful in company organization or restructuring.
User stories
Currently for Coydir v1.4
Note: User will refer to both HRE and HOD
Priorities: High (must have) - * * *, Medium (nice to have) - * *, Low (unlikely to have) - *
| Priority | As a … | I want to … | So that I can… |
|---|---|---|---|
* * * |
user | add a new employee | keep the database updated with the employee list. |
* * * |
user | delete a employee | remove entries that I no longer need. |
* * * |
user | list people in the database | keep track of who is in the company. |
* * * |
user | edit details of employees | correct the details of the employees. |
* * * |
user | view the employee’s email address | contact them via email for work related updates. |
* * * |
user | view the employee’s phone number | contact them via phone for work related updates. |
* * * |
user | view the employee’s address | mail them relevant documents if need be. |
* * * |
user | view the employee’s department | |
* * * |
user | view the employee’s total number of leaves and number of leaves left | track to make sure the leave requests from the employees are valid. |
* * * |
user | view details of employees | contact them if necessary. |
* * * |
user | save my data | load the data I input previously. |
* * * |
user with many employees | find an employee | get all relevant information about a particular employee. |
* * * |
user | find all employees in a specific department | see how many and who are in the specified department. |
* * * |
user | find all employees in a specific position | see how many and who are in the specified position. |
* * * |
new user | know what commands I can do | fully maximise the application and use all of the features provided. |
* * * |
user | add multiple employees at once | avoid wasting time adding employees one by one when multiple new employees have joined the company. |
* * * |
user | keep track of leaves taken so far | track which days the employee has taken leave over the year for accountability purposes. |
* * * |
user | see if an employee is on leave today | choose whether to allocate work to him based on his availability. |
* * * |
user | rate my employee based on their performance | |
* * * |
user | view the previous ratings of an employee | observe the performance trend and make managerial level decisions. |
* * * |
HOD | have an overview of how many people in the department are on leave | allocate manpower accordingly. |
* * * |
HOD | have an overview of the ratings of my employees | reward high performers and identify poor performers. |
* * * |
user | add leave amount to my employee | carry over leave from last year. |
* * |
user | change colour and theme of the app | use the app with my preferred mode (Dark or Light Mode). |
* * |
HRE | build an organisation chart | view a high level overview of the company’s organisation structure. |
* * |
HRE | archive past employees | keep a copy of past data while keeping current interface clean and fast. |
* * |
user | to undo my previous command | revert mistakes if necessary. |
* * |
user dealing with confidential information | have some form of authentication | prevent confidential data from being leaked out. |
* * |
HRE | keep track of monthly salary of my employees | know how much to pay them every month. |
* * |
HRE | keep track what time the employees starts and end work | factor in overtime into their pay. |
* * |
HRE | view the claims (transport claims, food claims etc) that employees make | compensate them back. |
* * |
expert user | customizable shortcuts | run frequently used commands faster. |
Use cases
(For all use cases below, the System is the Coydir and the Actor is the user, unless specified otherwise)
Use case: UC01 - Delete a employee
MSS
- User requests to list employees.
- Coydir shows a list of employees.
- User requests to delete a specific employee in the list.
-
Coydir deletes the employee.
Use case ends.
Extensions
-
2a. The list is empty.
-
2a1. Coydir shows an error message
Use case ends.
-
-
3a. The given ID is invalid.
- 3a1. Coydir shows an error message.
Use case resumes at step 2.
Use case: UC02 - Edit details of an employee
MSS
- User requests to list employees.
- Coydir shows a list of employees.
- User requests to edit a specific employee in the list.
-
Coydir replaces the data of the employee based on the user’s specified inputs.
Use case ends.
Extensions
-
2a. The list is empty.
-
2a1. Coydir shows an error message.
Use case ends.
-
-
3a. The given index is invalid.
-
3a1. Coydir shows an error message.
Use case resumes at step 2.
-
-
3b. The edited fields from the user is not in the correct format.
-
3b1. Coydir shows an error message informing user which field has invalid input and why it is invalid.
Use case resumes at step 2.
-
-
3c. Fields are empty.
-
3c1. Coydir shows an error message .
Use case resumes at step 2.
-
Use case: UC03 - Find details of an employee
MSS
- User requests to find all employees of a certain query (Name, Department, Position).
-
Coydir shows a list of all employees adhering to the query made.
Use case ends.
Extensions
-
2a. The query is empty.
-
2a1. Coydir shows an error message.
Use case ends.
-
-
2b. The fields in the query are not in the correct format.
- 2b1. Coydir shows error message informing user which field has invalid input and why it is invalid.
Use case ends.
Use case: UC04 - View details of an employee
MSS
- User requests to list employees.
- Coydir shows a list of employees.
- User request to view details of a specific employee in the list.
-
Coydir shows the details of the specific employee.
Use case ends.
Extensions
-
2a. The list is empty.
-
2a1. Coydir shows an error message.
Use case ends.
-
-
4a. The given index is invalid.
-
4a1. Coydir shows an error message.
Use case ends.
-
Use case: UC05 - Batch-Add multiple employees
Preconditions: .csv file with the data you want to import needs to be in /data folder.
MSS
- User specifies which filename of the file they want to batch-add from.
- Coydir finds the file and shows the updated list with all the new employees added.
Use case ends.
Extensions
-
2a. No file found.
-
2a1. Coydir shows an error message stating that no file is found.
Use case ends.
-
-
2b. File found but not CSV format.
-
2b1. Coydir shows an error message.
Use case ends.
-
-
2c. Compulsory fields (Name, Department, Position) in the
.csvare missing.-
2c1. Coydir shows an error message.
Use case ends.
-
-
2d. Fields in the
.csvare not in the correct format.-
2d1. Coydir shows an error message.
Use case ends.
-
Use case: UC06 - Allocate leave to employee
MSS
- User requests to list employees.
- Coydir shows a list of employees.
- User requests to add leave to specified employee and includes duration.
- User requests to view specified employee (UC04).
- Coydir shows the updated details of the employee.
Extensions
-
2a. The list is empty.
-
2a1. Coydir shows an error message.
Use case ends.
-
-
3a. The given ID of employee is invalid.
-
3a1. Coydir shows an error message.
Use case resumes at step 2.
-
-
3b. Date provided by user is invalid.
-
3b1. Coydir shows an error message.
Use case resumes at step 2.
-
-
3c. Date provided by user is overlaps with leave that the employee already has.
-
3c1. Coydir shows an error message.
Use case resumes at step 2.
-
-
3d. Start Date provided by user after End Date provided by user.
-
3d1. Coydir shows an error message.
Use case resumes at step 2.
-
-
3e. Date provided by user in the wrong format
-
3e1. Coydir shows an error message.
Use case resumes at step 2.
-
Use case: UC07 - Delete leave from employee
MSS
- User requests to list employees.
- Coydir shows a list of employees.
- User requests to view details of specified employee (UC04).
- Coydir shows details of specified employee.
- User requests to delete leave from employee indicating index of leave to delete.
- Coydir shows updated leave of employee.
Extensions
-
2a. The list is empty.
-
2a1. Coydir shows an error message.
Use case ends.
-
-
4a. Index to view employee is invalid.
-
4a1. Coydir shows an error message.
Use case ends.
-
-
6a. Index to delete leave is invalid.
-
6a1. Coydir shows an error message.
Use case ends.
-
Use case: UC08 - Add/Delete leave amount to employee
MSS
- User requests to list employees.
- Coydir shows a list of employees.
- User requests to edit details of specified employee to the updated leave (UC02).
- User requests to view specified employee (UC04).
- Coydir shows updated leave amount of employee
Extensions
-
2a. The list is empty.
-
2a1. Coydir shows an error message.
Use case ends.
-
-
3a. The given index to edit employee is invalid.
-
3a1. Coydir shows an error message.
Use case resumes at step 2.
-
-
3b. Leave inputted by User is in the wrong format.
-
3b1. Coydir shows an error message.
Use case resumes at step 2.
-
Use case: UC09 - View details of department
MSS
- User requests to view details of department.
- Coydir shows details of requested department.
Extensions
-
2a. Department does not exist.
- 2a1. Coydir shows an error message.
Use case ends.
Use case: UC10 - Rate the performance of an employee
MSS
- User requests to list employees.
- Coydir shows a list of employees.
- User requests to view details of specified employee.
- Coydir shows details of specified employee.
- User requests to rate the performance of employee.
- Coydir shows updated performance of employee.
Extensions
-
2a. The list is empty.
-
2a1. Coydir shows an error message.
Use case ends.
-
-
4a. Index to view employee is invalid.
-
4a1. Coydir shows an error message.
Use case ends.
-
-
6a. Index to rate is invalid.
-
6a1. Coydir shows an error message.
Use case ends.
-
-
6b. Rating input is invalid.
-
6b1. Coydir shows an error message.
Use case ends.
-
-
6c. Employee already rated for the day.
-
6c1. Coydir shows an error message.
Use case ends.
-
Non-functional requirements
Technical requirements
- Should work on any mainstream OS as long as it has Java
11or above installed. - The application should look and perform the same regardless of which mainstream OS is used.
- The data state should be persistent.
Performance requirements
- Should be able to hold up to 100 employees without a noticeable sluggishness in performance for typical usage.
- The system should be able to execute all commands within half a second (given constraint #1).
Quality requirements
- A user with above average typing speed (above 40 WPM) for regular English text (i.e. not code, not system admin commands) should be able to accomplish most of the tasks faster using commands than using the mouse.
- The product should be easy to use by users with little experience of using a command line application.
- Application should be accessible, and readily available to new users.
- It should be easy to begin adopting usage of the application for its intended use.
- The application should not create unnecessary files/hidden files that clog up the user’s disk.
- The product should offer at least two different themes (at least a light and dark setting) to accommodate different lighting environments.
Documentation requirements
- User guide should be sufficiently clear such that all users can understand how to use the app after reading the guide.
- Developer guide should be sufficiently clear such that any external readers can peruse it to understand the codebase thoroughly, enough to possibly add a new feature/property.
- Users should be able to access the relevant documentations from the application easily, if they require it.
Non-requirements
- This product is not required to manage/handle the on-site execution of HR processes (such as
add- hire an employee,delete- fire an employee). - This product is not required to support applicant screening and processing for HR recruitment.
Glossary
Technical Terminology
- Mainstream OS: For the purpose of this project, we define the mainstream operating systems as: Windows, Linux, Unix, OS-X.
- Private contact detail: A contact detail that is not meant to be shared with others.
- Entries: Profile of a person which contains all the necessary details about the person.
- User Interface (UI): A platform that acts as the medium between the user, and the application. This is what the user sees the application as.
- Command Line Interface (CLI): A user interface that relies on typing into a command line for user interaction with the application.
- Graphical User Interface (GUI): A user interface that relies on graphical usage (such as using a mouse) for user interaction with the application.
- jar: Stands for Java ARchive. A file format for aggregated Java class files, metadata, and resources for distribution and deployment.
- csv: Stands for Comma-Separated Values. A file format for storing grouped data in a table-like format.
- Diagram / Unified Modeling Language (UML) Diagram: A graphical model used to illustrate and represent processes, relationships, and concepts. UML is the format most widely adopted for designing and interpreting such diagrams.
Coydir Terminology
- Human Resources (HR): A core function of companies and businesses that involves the management of staff.
- Company: The overarching organization that is the context for the application’s usage.
- Employee: Any person or staff that is part of or under the management of the company.
- Profile: A collection of particulars and records applying to an individual employee.
- Department: A sub-division or group within the company. Note: for Coydir, we have a set of pre-defined Departments.
Miscellaneous
- WPM: Words Per Minute, a unit of measurement for typing speed.
Appendix: Instructions for manual testing
Given below are instructions to test the app manually.
Launch and shutdown
-
Initial launch:
-
Download the jar file and copy into an empty folder.
-
Double-click the jar file.
Expected Outcome: Shows the GUI with a set of sample contacts. The window size may not be optimum.
-
-
Saving window preferences:
-
Resize the window to an optimum size. Move the window to a different location. Close the window.
-
Re-launch the app by double-clicking the jar file.
Expected Outcome: The most recent window size and location is retained.
-
-
Utility Commands:
-
With the app open, key in
helpand enter.
Expected Outcome: The help window appears in front of the main app window. -
Click the button labelled “User Guide” at the bottom of the window.
Expected Outcome: A new tab opens in browser, leading to the Coydir User Guide. -
In the main app window, type
exitand enter.
Expected Outcome: The window closes, the same way it closed previously by clicking on the close button.
-
Basic commands
-
Listing all employees:
-
Prerequisites: Ensure that there is at least 1 person in the database.
-
Test Case:
list
Expected Outcome: On the left side panel, all employees are shown in the list (at least 1). There might not be any changes from before (if they have already been listed). -
Other valid listing commands:
list a,list 1,list n/John
Expected Outcome: Same as previous. -
Test Case:
find d/NoSuchDepartment, followed bylist
Expected Outcome: The first command should empty the list shown on the left panel. The second command displays all employees again (at least 1).
-
-
Viewing an employee:
-
Prerequisites: For all of these test cases, ensure that there is at least 1 employee present in the database. Then enter
listto display all employees. Additionally, take note of the total count of employees (you can see this by checking the largest index displayed on the left panel). -
Test Case:
view 1
Expected Outcome: On the right side panel, the employee profile of the first listed person is displayed. -
Test Case:
view 0
Expected Outcome: An error message appears, saying that the format of the command entered is incorrect. -
Test Case:
view x, wherexis a number larger than the total count of employees
Expected Outcome: An error message appears, saying that the index provided is invalid.
-
-
Clearing the database:
-
Prerequisites: Ensure that there is at least 1 person in the database. Additionally, take note of the highest employee ID available.
-
Test Case:
clear
Expected Outcome: On the left panel, there are no more employees displayed. The right panel should show the home panel, regardless of its previous state. -
Follow-up Test Case:
list
Expected Outcome: No employees are listed. Feedback says that all employees are listed. -
Follow-up Test Case:
add n/ClearTest j/Position d/Operations
Expected Outcome: A new employee is displayed on the left panel, with the employee ID value of 1.
-
Adding an employee
-
Adding an employee with all fields specified:
-
Test Case:
add n/John Doe j/Accountant d/Finance p/91234567 e/john@coydir.com a/Oak Street, Loudoun l/21 t/New hire
Expected Outcome: A new employee, with the name “John Doe”, appears at the bottom of the list of employees on the left panel (you might need to scroll down to view it).
-
Test Case:
-
Adding an employee with optional fields missing:
-
Test Case:
add n/Jack Doe j/Consultant d/Legal p/98765432 e/jack@coydir.com a/Pine Street, Loudoun
Expected Outcome: A new employee, with the name “Jack Doe”, appears at the bottom of the list of employees on the left panel (you might need to scroll down to view it). -
Test Case:
add n/Jill Doe j/Scheduler d/Administration
Expected Outcome: A new employee, with the name “Jill Doe”, appears at the bottom of the list of employees on the left panel (you might need to scroll down to view it).
-
-
Adding an employee with compulsory fields missing:
-
Test Case:
add n/Jane Doe j/Telemarketer p/99887766 e/jane@coydir.com a/Elm Street, Loudoun
Expected Outcome: An error message appears, saying that the format of the command entered is incorrect.
-
Test Case:
-
Adding an employee with invalid fields:
-
Test Case:
add n/Joe Doe j/Carpenter d/Craftsmenship
Expected Outcome: An error message appears, saying that the department field is invalid. -
Other invalid test cases:
addwith prefixes but empty arguments, or arguments that do not match specified constraints. Expected Outcome: An error message appears, saying the constraints of the invalid argument provided.
-
Editing an employee
-
Editing employees in general:
-
Prerequisites: For all of these test cases, ensure that there is at least 1 employee present in the database. Additionally, take note of the total count of employees (you can see this by entering
listand checking the largest index shown). -
Test Case:
edit 1
Expected Outcome: No changes occur. An error is shown, saying that there must be at least one field provided. -
Test Case:
edit 0 n/EditTest1
Expected Outcome: No changes occur. An error message appears, saying that the format of the command entered is incorrect. -
Other incorrect edit commands to try:
edit,edit x n/Valid Name(where x is larger than the list size),edit abcdef
Expected Outcome: Similar to previous.
-
-
Editing an employee while not viewing their profile:
-
Test Case:
edit 1 n/EditTest2 t/EditTestTag1 t/EditTestTag2
Expected Outcome: On the left side panel, the name of the first employee updates immediately to the new name “EditTest2”, and there are now two tags “EditTestTag1” and “EditTestTag2”. -
Test Case:
edit 1 a/EditTest2Address
Expected Outcome: No changes noticed on the left side panel, but upon clicking the first employee, notice the address on the right panel is updated to “EditTest2Address”.
-
-
Editing an employee while viewing their profile:
-
Prerequisites: Ensure there is at least 1 employee present in the list on the left side panel. If there isn’t, either enter
listto show all, and if there are none at all,addan employee first. Then, enterview 1to view the employee profile of the first employee. -
Test Case:
edit 1 e/EditTest3@email.com a/EditTest3Address
Expected Outcome: On the right side panel, the profile is updated such that the email is now “EditTest3@email.com” and the address is “EditTest3Address”. -
Test Case:
edit 1 n/EditTest3
Expected Outcome: On the right side panel, the profile is updated such that the name is now “EditTest3”. Similarly, the name should be the same on the left panel.
-
-
Editing an employee while finding:
-
Prerequisites: Ensure there is at least 1 employee in the database with a name that contains “e”. If you have been following the previous test cases, the employee “EditTest3” will suffice. Then, enter
find n/e, and enterview 1. -
Test Case:
edit 1 n/EditTest4Expected Outcome: On the right side panel, the profile is updated such that the name is now “EditTest4”. Similarly, the name should be the same on the left panel. -
Test Case:
edit 1 n/VoidExpected Outcome: On the left side panel, the edited employee disappears. The right side panel either shows the next employee (if there is any), or shows the home panel.
-
Deleting an employee
-
Deleting an employee in general:
-
Prerequisites: Ensure that there is at least 1 employee in the database.
-
Test Case:
delete 1
Expected Outcome: First employee is deleted from the list. Details of the deleted employee shown in the status message. Right panel now shows the next employee (if there is any), or shows the home panel. -
Test Case:
delete 0
Expected Outcome: No changes occur. An error message appears, saying that the format of the command entered is incorrect. -
Other incorrect delete commands to try:
delete,delete x(where x is larger than the list size),delete abcdef
Expected Outcome: Similar to previous.
-
Batch-adding employees
This feature requires the use of csv files. To follow the subsequent tests, create and save two csv files with the contents as given below.
If you wish to test using custom csv files, ensure that you do not have any commas in the values for the parameters, as this will result in incorrect parsing of the file. Additionally, ensure that the order of the columns is the same as specified below.
1st csv file: save as data/success.csv.
Name,Phone,Email,Position,Department,Address,Leave,Tags,
Kim Meier,84824249,kimmeier@example.com ,Frontend Engineer,Information Technology,Little India,20,Promotion coming,
Petris Mueller,96722343,,Marketing Intern,Marketing,,13,,
Paul Morty,,paul@example.com,UI/UX Engineer,Sales,,,Innovation Lead,
2nd csv file: save as data/duplicatePerson.csv.
Name,Phone,Email,Position,Department,Address,Leaves,Tags
Prittam Ravi,87438807,prittam@example.com,Chief Technology Officer,General Management,Blk 30 Lorong 3 Serangoon Gardens #07-18,14,collegaues/friends
Peter Lim,99272758,peter@example.com,Accountant,Finance,Blk 30 Lorong 3 Serangoon Gardens #07-18,14,collegaues/friends
Shawn Kok,99272758,shawn@example.com,Recruiter,Human Resources,Blk 30 Lorong 3 Serangoon Gardens #07-18,14,collegaues/friends
Kevin Chang,99272758,kevin@example.com,Factory Worker,Production,Blk 30 Lorong 3 Serangoon Gardens #07-18,14,collegaues/friends
Ng Shi Jun,99272758,shijun@example.com,Frontend Developer,Information Technology,Blk 30 Lorong 3 Serangoon Gardens #07-18,14,collegaues/friends
Prittam Ravi,87438807,prittam@example.com,Chief Technology Officer,General Management,Blk 30 Lorong 3 Serangoon Gardens #07-18,14,collegaues/friends
-
Batch-adding multiple employees:
-
Prerequisites: Must not have used any of the names provided in
data/success.csv. We recommend that you load the default sample data to Coydir. You can do this by exiting the app, deleting whatever data file you currently have (located atdata/database.json), then launching the app again. -
Test Case:
batch-add success.csvExpected Outcome: Three new employees are added, with the names “Kim Meier”, “Petris Mueller”, “Paul Morty”. -
Test Case:
batch-add duplicatePerson.csvExpected Outcome: No changes occured. An error message appears, saying that one person is found to be a duplicate. -
Follow-up Test Case:
batch-add success.csvExpected Outcome: Same as previous.
-
Finding employees
To follow the subsequent tests for the find feature, load the default sample data to Coydir.
You can do this by exiting the app, deleting whatever data file you currently have (located at data/database.json), then launching the app again.
-
Finding employees with just one filter:
-
Test Case:
find n/Alex
Expected Outcome: One employee is displayed on the left, with the name “Alex Yeoh”. The right panel displays their profile. -
Test Case:
find n/alex
Expected Outcome: Same as previous. -
Test Case:
find d/general
Expected Outcome: Three employees are displayed on the left, all in the “General Management” department. The right panel displays the first employee’s profile, “Alex Yeoh”. -
Test Case:
find j/a
Expected Outcome: Three employees are displayed on the left (IDs 2, 4, 5). The right panel displays the first employee’s profile, “Bernice Yu”.
-
-
Finding an employee with multiple filters:
-
Test Case:
find n/Roy j/UI d/Tech
Expected Outcome: One employee is displayed on the left. The right panel displays that employee’s profile, “Roy Balakrishnan”. -
Follow-up Test Case:
edit 1 d/Technology
Expected Outcome: The right panel updates to show that Roy is now in the “Technology” department. -
Follow-up Test Case:
edit 1 d/Sales
Expected Outcome: The left panel now displays nobody. The right panel shows the home panel. Upon enteringlistfollowed byview 6, observe that Roy’s department is now “Sales”.
-
Adding employee leaves
For the following tests, ensure that there is at least 1 employee, with the default total leaves of 14 days.
If there are more than one, any of these employees can be used, and can be used for different test cases as well.
In each of the test cases, we will refer to this employee’s ID as x, for generality.
Note: Changes are mostly visible only when viewing the employee profile.
Therefore, we recommend that when performing a test case for an employee (with ID x), you first view the profile to easily observe the outcome.
-
Adding leave period for an employee
-
Test Case:
add-leave id/x sd/01-01-2022 ed/01-01-2022
Expected Outcome: Total leaves remain the same. Leaves left decreases by 1. A new row is added to the table of leave periods, with the correct start and end date, with duration (1 day). -
Test Case:
add-leave id/x sd/Today ed/Today, whereTodayrefers to the present date, in DD-MM-YYYY format
Expected Outcome: Same as previous. Additionally, the property “On leave” now reads “True”. -
Test Case:
add-leave id/x sd/31-12-2020 ed/01-01-2021
Expected Outcome: Total leaves remain the same. Leaves left decreases by 2. A new row is added to the table of leave periods, with the correct start and end date, with duration (2 days).
-
-
Adding invalid leave period for an employee
-
Prerequisites: Follow test 1(i) to add a leave period for 1 Jan 2022 for employee ID
x. -
Test Case:
add-leave id/x sd/01-01-2022 ed/02-01-2022
Expected Outcome: No changes occured. An error message appears, saying that overlapping leaves are not allowed. -
Test Case:
add-leave id/x sd/31-04-2022 ed/01-05-2022
Expected Outcome: No changes occured. An error message appears, saying that there were invalid date inputs. -
Test Case:
add-leave id/x sd/01-05-2022 ed/15-05-2022
Expected Outcome: No changes occured. An error message appears, saying that the employee does not have enough leaves left. This is assuming that the total leaves is 14, the default value. Else, you can adjust the end date in the example provided to achieve a duration longer than the available leaves.
-
Deleting employee leaves
For the following tests, ensure that there is at least 1 employee, with the default total leaves of 14 days.
If there are more than one, any of these employees can be used, and can be used for different test cases as well.
In each of the test cases, we will refer to this employee’s ID as x, for generality.
In addition, prior to running each test case, ensure that the employee has at least one leave period.
Note: Changes are mostly visible only when viewing the employee profile.
Therefore, we recommend that when performing a test case for an employee (with ID x), you first view the profile to easily observe the outcome.
-
Deleting leave period for an employee
-
Test Case:
delete-leave id/x i/1
Expected Outcome: Total leaves remain the same. Leaves left increases by the duration of the corresponding leave period. The corresponding row in the leaves table is deleted. -
Test Case:
delete-leave id/x i/y+1, whereyis the number of leave periods the employee has
Expected Outcome: No changes occured. An error message appears, saying that the index provided is invalid. -
Test Case:
delete-leave id/x i/0
Expected Outcome: No changes occured. An error message appears, providing the constraints for numbers.
-
Rating employee performance
For the following tests, ensure that there is at least 1 employee, who has never been rated prior.
If there are more than one, any of these employees can be used, and can be used for different test cases as well.
In each of the test cases, we will refer to this employee’s ID as x, for generality.
Note: Changes are mostly visible only when viewing the employee profile.
Therefore, we recommend that when performing a test case for an employee (with ID x), you first view the profile to easily observe the outcome.
-
Rating an employee’s performance
-
Test Case:
rate id/x r/5
Expected Outcome: The “Performance” property of the employee is updated to “5”. On the “Performance History” graph, there will be a new node with a rating value of “5”, and a timestamp of today’s date. -
Follow-up Test Case:
rate id/x r/4
Expected Outcome: No changes occured. An error message appears, saying that the employee has already been rated for the day. -
Test Case:
rate id/x r/6
Expected Outcome: No changes occured. An error message appears, saying that the number provided is not a valid rating.
-
Viewing department overview
For the following tests, ensure that there is at least 1 employee (who will be in 1 department). Any department (that has at least 1 person) can be used, but for ease and simplicity, we will be using “Sales” in our examples, as it is has the fewest letters.
-
Viewing the department overview
-
Test Case:
view-department Sales
Expected Outcome: On the right panel, the department name (“Sales”) is shown. Other information includes number of employees (available, on leave), and ratings of all employees. -
Follow-up Test Case:
add n/viewDeptTest j/Position d/Sales
Expected Outcome: The new employee is displayed on the left panel. On the right panel, the number of employees increments by 1, and a new row is added to the “Rating Table” with the rating “N/A” for the new employee. -
Follow-up Test Case:
rate id/x r/5, wherexis the employee ID of the employee added in the previous test
Expected Outcome: The rating table is updated with the new rating of the previously added employee. -
Other follow-up test cases include adding/deleting data relevant to employees in the department, such as leaves, performance, or their presence in the database. In each scenario, the right side panel should update itself to display the new information immediately, if there is any.
-